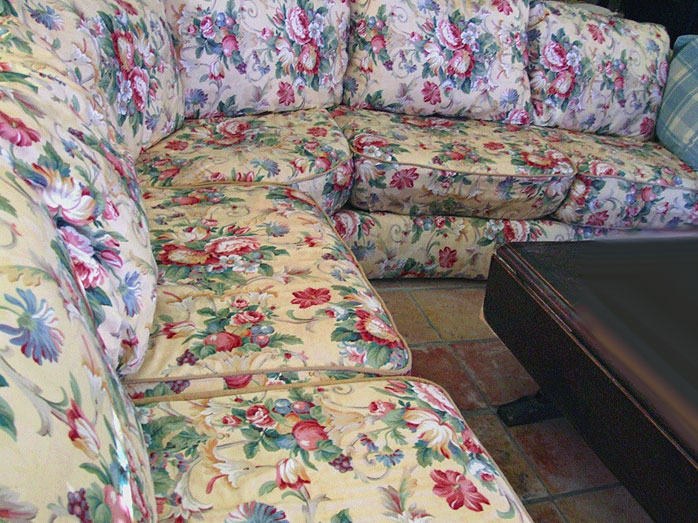
WIth the help of a free online video, I decided in early May, that I could recover my sofa.
How it started: After a flurry of spring cleaning, my sofa, with its sad, worn, age soiled upholstery stood out like the elephant in the room. We either needed to replace the ugly-but-comfy sofa or cover it with something, anything! more permanent than layered sheets. About that time I happened upon a video that made covering a pillow look soooo easy- with piping even!
I watched that video by Threadbanger a couple of times and it gave me the guts to try to give that old sofa a make-over. After all, what is a sofa but a collection of pillows? If I could cover one loose pillow, surely I could do a bunch. Since it showed one pillow being made in less than five minutes, I had wild hopes I could finish this project while hubby was off to Canton for three days. A cinch! and wouldn't he be surprised?
aha ha ha *gasp* aha ha ha . In three days, I had ONE pillow completed. ONE!!!! My sewing skill level was thread a needle and go in and out.
Really not all that confident I could do it, I had decided NOT to buy fabric but to use what was on hand - a bolt of about 13 yds that cost five dollars at an estate sale. I knew it wasn't nearly enough so I would have to make the bottoms and backsides out of some muslin I already had, the end pillows out of blue and cream plaid, the piping out of an old sheet and forget about matching the pattern. I used heavy cloth clothesline bought from the Dollar Store for the piping. My idea was if I did ok, well, later I could do it again with good stuff.
Regrets: Knowing now that it is a major labor/time intensive project and that I'm not anxious to do it again, I sure wish I had invested in enough fabric in a fabric I loved (I don't particularly love this) to have enough without supplementing with muslin and to match the patterns. The sheet made ok piping covers but I don't know how long it will hold up; however, the dollar a bolt for the clothesline for piping was a winner. The contrasting end pillows? Those I love...
It took about three weeks, not three days -silly me. I found myself chanting, "One potato, two potato, three potato, four..." as I stacked up the pillows. Finally I was able to say "NO MORE". I managed to finish it right before my 83 yr old mom came to visit. She loved it! (and at least it's fresh and clean) Total cost? Less than ten dollars.
Next Project: I've got my eye on that old stained drop-leaf coffee table. I KNOW I could have it painted blue by the time my hubby returns from Canton next month. What do you think? Would I like the design on the fabric better if the coffee table is a matching blue? Indecision: Would it be better in a cream that matches the sofa with blue accessories? I think the blue with accessories in the natural wood and cream and that berry would look better with the floor. Maybe blue that chips away to rich cream underneath and some wood peeking through? ARGHH! I never know what I will like best. Help me.
Here's the video that inspired me. They make it look soooooo easy.
Painting Realistic Roses: If you are looking for a book to help floral artists make the jump from one-stroke painting to a more realistic painting of a rose, look no further. By far the most comprehensive and influential has to be Roses and the Fine Art of China Painting by Sonie Ames. Sonie Ames mastered the art of sharing how to paint luscious roses as none of her contemporaries have since. This book is stuffed with breathtaking full color step-by-step instructions and examples. Search the eBay widget below to find one. This book is scarce: Recently, only one was found in a search by eBay on auction. However, for all artists who want to learn more about painting realistic garden roses- if you could only have ONE book, it should be Roses and the Fine Art of China Painting by Sonie Ames. It's well worth the wait and the search.
*****************************************************
Thank you, Celestina, for this beautiful *"Arte Y Pico Award".



 Thank you, Celestina, for this beautiful *"Arte Y Pico Award".